In this article I will describe how I deploy a full Laravel application on Azure App Services. The official Azure Documentation has some good resources available to get started, but weren’t enough for me to achieve my goals. Here are the links to those resources:
- Tutorial: Build a PHP and MySQL app in Azure App Service
- Tutorial: Build a PHP (Laravel) and MySQL Flexible Server app in Azure App Service
What I was missing in these resources were the actual steps required for a bigger Laravel application than the one that was used in the tutorials.
Laravel application
To make the experience more realistic I’ve taken a School Management System written in Laravel 7 from laravelproject.com. Not only is this a bit more complex application than the one used in the tutorials, but it might also be useful for your own learning goals and achievements.
Further I also need the following for my local development and to access the Azure API for managing my resources.
Step-by-step tutorial
Because I like to document things for myself, here below you can find a step-by-step tutorial on how to prepare and deploy your Laravel application to Azure App Services.
In this tutorial I’m using a local MySQL database that sits on the App Service itself, which is good enough for this tutorial and demo purposes, but is not recommended for production ready applications. To learn more about migrating from an App Service MySQL to a full clustered Azure Databases for MySQL, read my previous article “Connecting with MySQL“.
1. Log in your Azure Account
If you already have an Azure Subscription, but you haven’t used the Azure command line interface before, you need to login first. If you want to try it out for yourself, create a FREE Azure Subscription for 12 months.
az loginThis will open up a new browser window or tab, where you can log into your Microsoft Azure account. After a successful login, you can close this tab or window.
[
  {
    "cloudName": "AzureCloud",
    "homeTenantId": "12345678-abcd-1234-abcd-abcd1234efgh",
    "id": "abc123ef-5678-4321-9876-1234abcd5678",
    "isDefault": true,
    "managedByTenants": [],
    "name": "Pay as You Go",
    "state": "Enabled",
    "tenantId": "9876hgfe-1234-1234-abcd-efghabcd1234",
    "user": {
      "name": "user@company.com",
      "type": "user"
    }
  }
]
You should see something similar as above, indicating you have successfully authenticated with Azure using the command line.
2. Define your naming convention upfront
To make life easier, I export some variables upfront that I will be using for all the commands that will follow. Here’s a short description of each:
- AZ_RESOURCE_GROUP: The name of the logical grouping of your application, in this group all cloud resources will be created
- AZ_APP_SERVICE_PLAN: The name of the App Service Plan that will be used by our App Service(s)
- AZ_APP_SERVICE_NAME: The name of the App Service that will run our application
export AZ_RESOURCE_GROUP=laravel-sms-rg
export AZ_APP_SERVICE_PLAN=laravel-sms-asp
export AZ_APP_SERVICE_NAME=laravel-sms-app
3. Create a resource group
I can’t create any resources without a Resource Group, so I create one to get started.
az group create --location westeurope --name $AZ_RESOURCE_GROUP4. Create an Azure App Service Plan
Now that I have an Azure Resource Group created, I can start defining the plan I want to use. For this example, I will be using the F1 Free plan as this is sufficient for the purpose of this tutorial. For real applications with (paying) users, a higher tier plan would be recommended. See the Microsoft App Service Plan overview for more information.
az appservice plan create \
  --sku F1 \
  --location westeurope \
  --resource-group $AZ_RESOURCE_GROUP \
  --name $AZ_APP_SERVICE_PLAN
This statement will create a FREE App Service Plan for development purposes.
5. Create a Windows Azure App Service
az webapp create \
  --deployment-local-git \
  --runtime "PHP|7.4" \
  --resource-group $AZ_RESOURCE_GROUP \
  --plan $AZ_APP_SERVICE_PLAN \
  --name $AZ_APP_SERVICE_NAME
This statement will create a new App Service on our free App Service Plan, using a PHP 7.4 runtime (this is the latest version supported by Windows on Azure App Services).
6. Set the virtual application path and default documents
For PHP applications, I need to make small adjustments to the default configuration of an App Service:
- I enable a local MySQL database (for demo only)
- I move the document root to site\wwwroot\public for our Laravel app
- I make sure that index.php is the default page, with index.html and hostingstart.html as fallback
az webapp config set \
  --resource-group $AZ_RESOURCE_GROUP \
  --name $AZ_APP_SERVICE_NAME \
  --http20-enabled true \
  --php-version 7.4 \
  --generic-configurations \
  "{\"localMySqlEnabled\": true,\"virtualApplications\": [{\"physicalPath\": \"site\\\\wwwroot\\\\public\",\"preloadEnabled\": false,\"virtualDirectories\": null,\"virtualPath\": \"/\"}], \"defaultDocuments\": [\"index.php\",\"index.html\",\"hostingstart.html\"]}"
7. Set the web app environement variables
The “.env” file in this project (or the .env.example file) contains all environment variable values that the application requires. The most important ones are now transferred to the App Service settings so my application can make use of it.
For some particular reason I was not able to retrieve the local MySQL connection string using Azure CLI. In order to know what my database settings are for the local MySQL instance, I’ve made a simple info.php page with the following contents:
<?php echo $_SERVER['MYSQLCONNSTR_localdb'];This will give me the connection string required to access the local MySQL database.
Database=localdb;Data Source=127.0.0.1:3306;User Id=azure;Password=XXXXXXWARNING! Remove this file as soon you have registered these settings!!! The whole world can see it.
Now I can go ahead and configure the App Service.
az webapp config appsettings set \
  --resource-group $AZ_RESOURCE_GROUP \
  --name $AZ_APP_SERVICE_NAME \
  --settings \
    APP_NAME=Laravel \
    APP_ENV=local \
    APP_KEY={generate one with php artisan key:generate} \
    APP_DEBUG=true \
    APP_URL=https://$AZ_APP_SERVICE_NAME.azurewebsites.net \
    DB_CONNECTION=mysql \
    DB_HOST="127.0.0.1" \
    DB_PORT="3306" \
    DB_DATABASE="localdb" \
    DB_USERNAME="azure" \
    DB_PASSWORD="XXXXXX"
8. Retrieve the Git repo to push to
To get immediate results, I want to use GIT push to upload my application. Because I need to have composer packages downloaded as well, I ensure I create two more files:
- .deployment: This is a file indicating that something needs to be done after I’ve pushed my code to the local GIT repository
- deploy.cmd: A Powershell script that will perform composer install after I’ve pushed the code.
In the early days of Azure, I used a bash script which worked well. But I found this Powershell example at the GitHub repository for Kuduproject, the tool Azure uses in the background, and they work really well.
Here’s the content of my .deployment configuration:
[config]
command = deploy.cmd
And here’s the full deploy.cmd contents:
@if "%SCM_TRACE_LEVEL%" NEQ "4" @echo off

:: ----------------------
:: KUDU Deployment Script
:: Version: 1.0.12
:: ----------------------

:: Prerequisites
:: -------------

:: Verify node.js installed
where node 2>nul >nul
IF %ERRORLEVEL% NEQ 0 (
  echo Missing node.js executable, please install node.js, if already installed make sure it can be reached from current environment.
  goto error
)

:: Setup
:: -----

setlocal enabledelayedexpansion

SET ARTIFACTS=%~dp0%..\artifacts

IF NOT DEFINED DEPLOYMENT_SOURCE (
  SET DEPLOYMENT_SOURCE=%~dp0%.
)

IF NOT DEFINED DEPLOYMENT_TARGET (
  SET DEPLOYMENT_TARGET=%ARTIFACTS%\wwwroot
)

IF NOT DEFINED NEXT_MANIFEST_PATH (
  SET NEXT_MANIFEST_PATH=%ARTIFACTS%\manifest

  IF NOT DEFINED PREVIOUS_MANIFEST_PATH (
    SET PREVIOUS_MANIFEST_PATH=%ARTIFACTS%\manifest
  )
)

IF NOT DEFINED KUDU_SYNC_CMD (
  :: Install kudu sync
  echo Installing Kudu Sync
  call npm install kudusync -g --silent
  IF !ERRORLEVEL! NEQ 0 goto error

  :: Locally just running "kuduSync" would also work
  SET KUDU_SYNC_CMD=%appdata%\npm\kuduSync.cmd
)

::::::::::::::::::::::::::::::::::::::::::::::::::::::::::::::::::::::::::::::::::::::::::::::::::::::::::::::::::::::::::::::::::
:: Deployment
:: ----------

echo Handling PHP Web Site deployment.

echo %DEPLOYMENT_SOURCE%
echo %DEPLOYMENT_TARGET%

:: 1. Composer.phar
IF EXIST "%DEPLOYMENT_SOURCE%\composer.json" (
  cd %DEPLOYMENT_SOURCE%

  IF NOT EXIST "%DEPLOYMENT_SOURCE%\composer.phar" (
    echo Composer.phar not found. Downloading...
    call curl -s https://getcomposer.org/installer | php
    IF !ERRORLEVEL! NEQ 0 goto error
  ) ELSE (
      echo Attempting to update composer.phar
      php composer.phar self-update
  )

  call php composer.phar install --no-dev --no-progress --optimize-autoloader --quiet --no-interaction --no-plugins
  IF !ERRORLEVEL! NEQ 0 goto error
)

:: 2. KuduSync
IF /I "%IN_PLACE_DEPLOYMENT%" NEQ "1" (
  call :ExecuteCmd "%KUDU_SYNC_CMD%" -v 50 -f "%DEPLOYMENT_SOURCE%" -t "%DEPLOYMENT_TARGET%" -n "%NEXT_MANIFEST_PATH%" -p "%PREVIOUS_MANIFEST_PATH%" -i ".git;.hg;.deployment;deploy.cmd,composer.phar"
  IF !ERRORLEVEL! NEQ 0 goto error
)

::::::::::::::::::::::::::::::::::::::::::::::::::::::::::::::::::::::::::::::::::::::::::::::::::::::::::::::::::::::::::::::::::
goto end

:: Execute command routine that will echo out when error
:ExecuteCmd
setlocal
set _CMD_=%*
call %_CMD_%
if "%ERRORLEVEL%" NEQ "0" echo Failed exitCode=%ERRORLEVEL%, command=%_CMD_%
exit /b %ERRORLEVEL%

:error
endlocal
echo An error has occurred during web site deployment.
call :exitSetErrorLevel
call :exitFromFunction 2>nul

:exitSetErrorLevel
exit /b 1

:exitFromFunction
()

:end
endlocal
echo Finished successfully.
With those two files added to the code repository, I can now retrieve the GIT URL of my Azure App Service to where I can push my code.
az webapp deployment source config-local-git \
  --resource-group $AZ_RESOURCE_GROUP \
  --name $AZ_APP_SERVICE_NAME
This will return something like the following
{
  "url": "https://laravelsms@laravel-sms-app.scm.azurewebsites.net/laravel-sms-app.git"
}
9. Create a deployment user
az webapp deployment user set \
  --user-name laravelsms
This command prompts me for a password that GIT will use to push my code to the azure repository!
10. Add to your git repo and push
git remote add azure https://laravelsms@laravel-sms-app.scm.azurewebsites.net/laravel-sms-app.git
git push azure master
Now the password created in step 9 should be entered here.
Password for 'https://laravelsms@laravel-sms-app.scm.azurewebsites.net':Immediately after I’ve provided my password, GIT pushes the code to the app service where the deployment command will run composer install for me.
Enumerating objects: 370, done.
Counting objects: 100% (370/370), done.
Delta compression using up to 8 threads
Compressing objects: 100% (200/200), done.
Writing objects: 100% (370/370), 4.38 MiB | 951.00 KiB/s, done.
Total 370 (delta 145), reused 363 (delta 143), pack-reused 0
remote: Resolving deltas: 100% (145/145), done.
remote: Updating branch 'master'.
remote: Updating submodules.
remote: Preparing deployment for commit id '4e7fe5aab7'.
remote: Running custom deployment command...
remote: Running deployment command...
remote: Handling PHP Web Site deployment
remote: .....
remote: Finished successfully.
remote: Running post deployment command(s)...
remote: Triggering recycle (preview mode disabled).
remote: Deployment successful.
To https://laravel-sms-app.scm.azurewebsites.net/laravel-sms-app.git
   4e7fe5a..4c24617  master -> master
Because I’m using a local MySQL database, I’m not able to use Laravel’s Migration too. Instead, I take an export of my data from my workstation, and via the Azure Portal I’m able to access PHPMyAdmin. Here I can import my data.
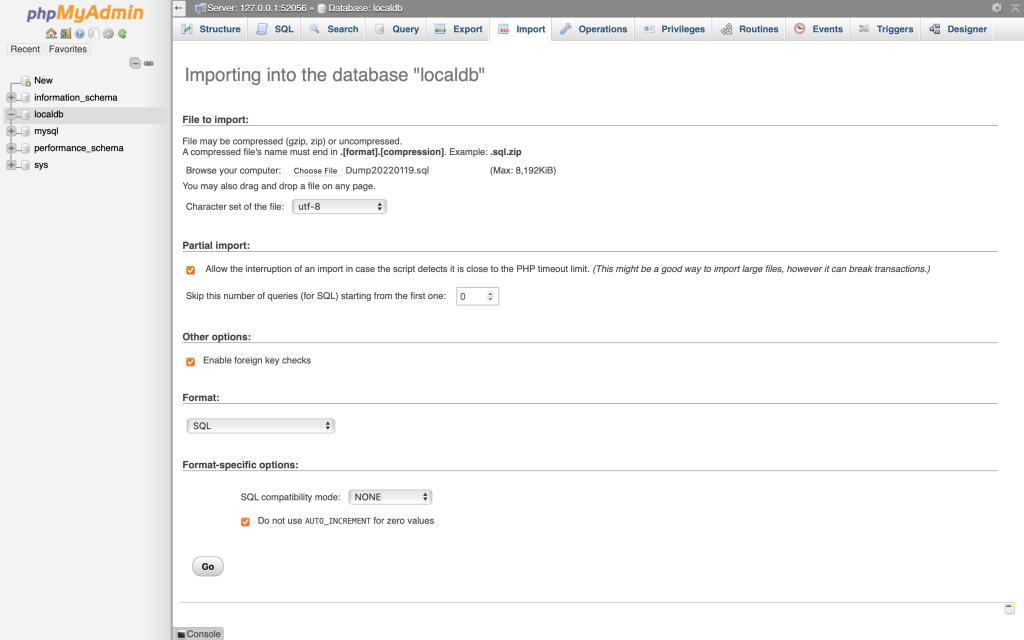
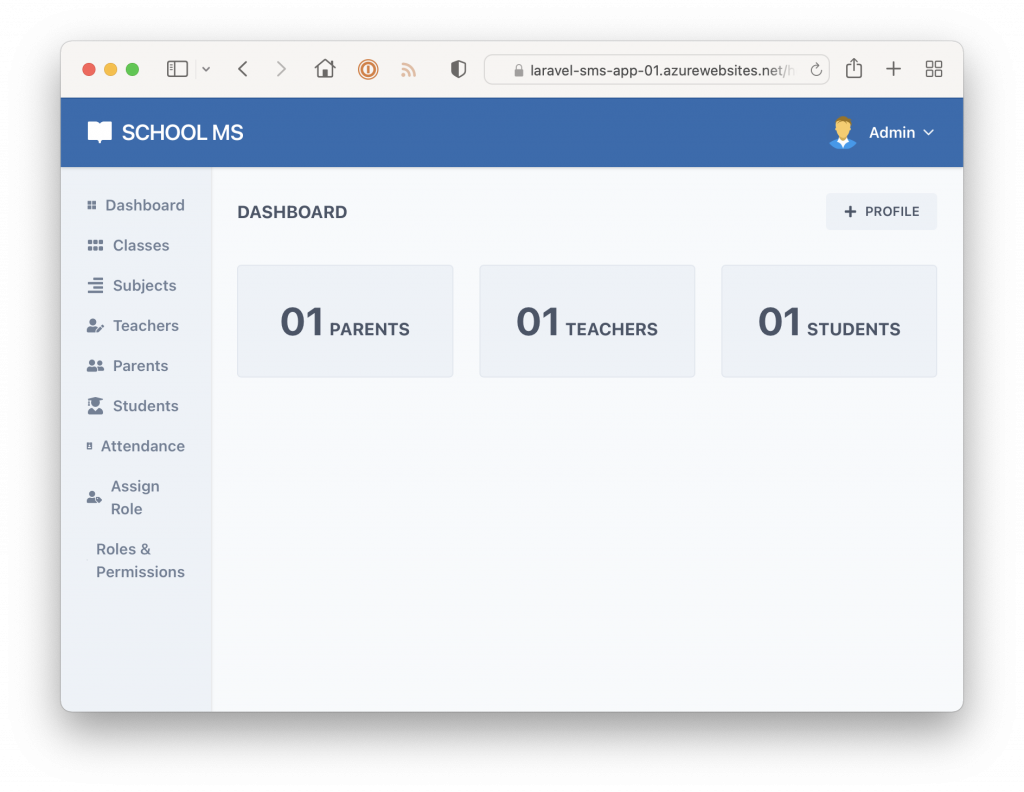
Once everything is imported, I can now view my application as it runs on Azure App Services.
11. Remove your resource group when no longer needed
Once I’m done playing with this application, I can safely remove the whole resource group which will clean up all resources created within.
az group delete --name $AZ_RESOURCE_GROUPWARNING! This will destroy and removes all your resources within this resource group!!!
I hope you enjoyed this tutorial. Feel free to leave a comment or contact me if you have questions. Until next time ?
